Monday, September 6, 2010

Vacancy!

The Elvebak B&B is now open! I've been working on fixing up our guest room pretty much since April. Slowly. This room used to be the office but when our room mate moved out we switched rooms since his room was bigger and we spend most of our days in the office. The first thing that happened to the room was it got a new paint job. {I guess 2 rooms painted pink was too many} I bought the paint at the Habitat for Humanity ReStore, 1 can of barely used Behr for $3!
{before: when it was the office} 
 {before: after we switched rooms}
{after the paint + new night stands}
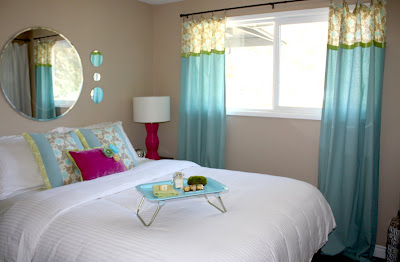
The room sat looking like this since pretty much since June. It served it's purpose, but was pretty darn boring. I knew that I wanted my color scheme to be chartreuse, turquoise, and yellow but was uninspired on what to do. Being on a budget also made it harder. I didn't want to spend too much money so I was trying to use things that we already had. It took a while, but everything finally came together and I couldn't be happier! Take a look:
{I sewed the curtains and toss pillows, and painted the breakfast tray, lamp, and frames} 
 
Price break down:
Bedding, Mirrors, Curtains, Wall Hooks, Toss Pillows, Fabric, Pink Spray Paint, Lamp Shade, - $0 already had
Wall Paint - $3
Night stands - $15 Thrift Store
Lamp - $5 St. Vinny's
Breakfast Tray - $1.49 St. Vinny's
Frames around hooks - $1.50 garage sale
Ribbon for Curtains - $2.49 Micheal's
Alarm Clock - $1.49 St. Vinny's
Hanging Pottery Barn Lanterns - $10.96 Goodwill
Light Fixture - $2 garage sale
Blue Spray Paint - $3.00
Flowers on pink pillow - FREE {made by my friend Kara}
Now that's staying on a budget!

{more to come about the DIY projects}

1 dilemma I'm still facing is whether or not to paint the night stands. I think they would look good painted, but the wood is also nice - thoughts?

1 room is available.
Reservations are required! :-)

Thursday, September 2, 2010

Venting

It's the little things that make a huge impact so I couldn't ignore our vent covers. Yes, vent covers. All of our heater covers were white when we moved in. Which was fine, but when we put in our new flooring suddenly the white covers on the dark wood was not a good combination. We didn't need to highlight the heater vents. So, solution, espresso spray paint! It's a cure all! Take a look:
{Before} 
{During}
 {After}
 
Each floor vent in the house, with the exception of the bathroom, got an espresso makeover. *sigh* much better!
Another vent cover in the house got a makeover too. The large one in our hallway. It was dirty, brassy, and a major eye sore! 
 
{while we're on the topic of our hallway - we got a new light fixture at a garage sale for $2! We love it, even though my mom said it looked like it was from outer space. hardly. The living room and hallway also got a new paint job - more about that later.}
{unscrewed the vent from the ceiling}
 
{spray painted a flat white to blend with the ceiling}
ta-da! 
 
I think I keep spray paint companies in business, I don't know what I'd do without it.
Thanks for reading my boring post about vent covers.

Tuesday, August 31, 2010

just a peek

I've been working on our guest room for a few months now, slowly. Just in the last weekend I finally had a vision for the room and now it's coming together! Just a few more touches. Take a peek

Monday, August 30, 2010

Drinks anyone?

A couple weeks ago I was 2nd-handing with my friend Kara and we came across this fabulous 70's looking/fake wood veneer cart. I had been wanting to get a drink cart for our patio and when I saw $5 on the price tag I knew this would be perfect!
I debated on how to fix it up {Adam actually said I he liked the wood look and I shouldn't paint it, um - no, sorry husband} I was debating between white and green like the patio chairs I fixed up, or white and yellow.
I took the whole thing apart to prime and paint.
and... I decided on Yellow! and am glad I did!
 
Thank goodness I had a before picture so I could see how to put the darn thing back together. I ended up having to print the picture off so I could figure it out! Once I did I was super happy with how it turned out.
Ta Da!
{straw dispenser at a garage sale $0.50}
 
{utensil & napkin holder, from GoodWill $0.99}
 
It's a perfect addition to our patio! One last thing I need to do is polyurethane the yellow parts. I have it, I was just too excited to hold up posting it any longer. We're ready to have a party!

Thursday, July 29, 2010

Mmmmm....

'Tis the season for fresh berries! I've been trying to take full advantage of u-pick farms and getting some berries in the freezer. So far my friend Kara and I have picked blueberries and raspberries, and I even got Adam to pick blueberries with me one day and we picked 12lbs! At a farm only 1 mile down the road, Blueberry Meadows, they sell u-pick blueberries for $1.25 a pound! The Raspberry farm we found sold u-pick for $1 a pound! Can't beat that when at the grocery store a little pint of berries costs at least $3+  Since I have all these berries on hand I've been trying out some new recipes and making some delicious summer treats!
My favorite cobbler I've made so far was made from a recipe I found on allrecipes.com It is called 'Apple Blueberry Crisp' Mmmmm... so good!

2 Granny Smith Apples {peeled & sliced}
1 Cup Blueberries {I added more}
*1 Cup Raspberries
1/2 tsp cinnamon
1/4 Cup sugar
1 Tbs Cornstarch
1/4 tsp salt
1/2 Cup Flour
1/2 Sugar
1/3 Cup Butter
*The original recipe didn't call for raspberries, but I am glad I added them
 
Mix the apples, blueberries, sugar, cinnamon, cornstarch, and salt in a baking dish. In a bowl combine the flour and sugar. Using your fingers, blend the butter until the mixture resembles course sand. Spread the flour mixture over the fruit evenly. {I doubled the recipe in this picture to share with our favorite aunt & uncle to thank them for taking care of Charlie and Hamilton when we go out of town :-) }
Bake 35-40 minutes at 350 degrees until the filling is thick and bubbly.
Serve with frozen yogurt! Yum I want some right now!
Another recipe I recommend is for Healthy, yes Healthy, Banana Cookies. My sister Jesi originally shared this recipe with me and I decided to try it out with Blueberries!

Here is my version of the recipe:

3 ripe bananas {make sure they are ripe, getting black}
2 cups oats
*1 cup blueberries
*1 tsp cinnamon
*1/4 tsp nutmeg
1/3 cup vegetable oil
1 teaspoon vanilla extract
*handful of chocolate chips
 *the original recipe calls for dates instead of those four items.
Another idea, Jesi adds apples into hers when she makes them - Yum!
 
Preheat oven to 350 degrees. In a large bowl, mash the bananas. Stir in oats, blueberries, cinnamon, nutmeg, oil, and vanilla. Mix well, and allow to sit for 15 minutes. Drop by teaspoonfuls onto an ungreased cookie sheet.
Bake for 20 minutes or until lightly brown.
YUM! Super easy and super good!

I also made a Apple, Raspberry, Blueberry Crisp. Still delicious, but not my favorite.
And, Blueberry muffin tops! Mmmm!
We're having company tomorrow, I think I might need to make some more treats!

Saturday, July 17, 2010

Front door vamp up

I am WAAAY behind on posting about our recent DIY/fix-it-up projects we've been working on, but actual summer weather has finally arrived so we've been taking full advantage of it! One quick project I did about a month ago was I painted our front door apple green! I had been wanting to paint the door some color for some time, but was unsure what color would look right with our ALL white house with blue/gray trim. I originally wanted to paint the door yellow; bright, fun, cheery, welcoming... But then I thought "what would a Christmas wreath look like on a yellow door" hmm. Then I thought black would look nice, but that seemed a little boring for me. To help me decide on a door color I took a picture of the front of our house, brought it into Photoshop, and colored the door!
Here were my choices:
{only kidding, our mailbox is already pink, I can't push my limits too much} :-)
 
And, I decided on the green! It's a natural color that looks good with grass, trees, dirt... my car! and come Christmas time it will be the perfect shade to hang a wreath on! To make this even better I already had this shade of green that we bought last summer off the "opps" rack at Home Depot for $5 - I forgot about it, $5 we spent last summer well spent!
{before}
{after}

 
While I was painting Charlie and Hamilton were caged, and Trudie sun bathed!
 
I really like how it turned out, it gives our house some much needed outside character.

Related Posts Plugin for WordPress, Blogger...